Cardboard is a great material to work with. When we were kids we loved to build the cardboard forts. It’s a game which everyone has played in his childhood. Now as we have become adult, so we get fascinated in a different way. Well decorated brick walls with attractive patterns inspire us more. Although the time has changed the cardboard wall is still a great idea. Your storeroom might be definitely occupied with a heap of custom cardboard boxes. With a little creativity, you can turn them into a wall. It will prove of great benefit in your home or office. It can separate a large room into two smaller ones or may act as a divider wall for someplace.

Sometimes there are places which you do not want to connect but building a wall is the only available option. Before investing in the expense of carpenter, consider creating a wall out of cardboard. This will serve an affordable solution in redesigning your place. Creating a wall from cardboard boxes is extremely easy. You need nothing to purchase from the market rather use the supplies available with you in your home. It would be great fun and your creation will be a great surprise for you. Below are some of the easy steps to turn cardboard boxes into a wall:
Table of Contents
Things You Require:
- Measuring tape
- Cardboard
- Utility knife
- Duct tape
- Pencil
- Ruler
- Paint
- Paintbrush
- Glue
Step 1: Measure the Area for the Wall
The first step of the process is to measure the area where you want to place the wall. Measure all the dimensions including the height, width, and length of the space. Use a fine measuring tape for this purpose. Engage any family member with you. This facilitates you in measuring the dimensions accurately in less time.
Step 2: Gather the Cardboard
After taking all the measurements, the next step is to collect the cardboard. You can obtain the cardboard from a number of custom printed boxes lying in any corner of your house. If you are unable to find a large number, visit any retail store nearby. You can get the custom boxes from there. Cut out their taped ends and convert them to cardboard sheets. Cut off enough pieces of cardboard to match the measurements you have taken.
Step 3: Tape the Cardboard Together
Tape all the custom printed boxes together. Use a strong plaster wall seam tape for this purpose. Such tape will allow you to paint the cardboard boxes properly. If you use any other tape it will not allow you to paint the wall from the portion where the tape is stuck.
Step 4: Stand the Wall

Once you have taped all the custom cardboard boxes together, the next step is to lay the wall on the floor. Measure the width of cardboard and mark after two feet using a pencil and a ruler. Now fold the cardboard similar to an accordion. After every two-foot mark, start folding the cardboard lengthwise. As each fold is made, turn the cardboard toward the opposite direction of the fold. Now make your wall stand upright. This box beam creates a framework for the custom boxes wall to stand.
Step 5: Paint
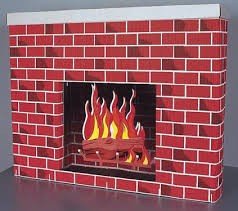
Once your wall is ready, paint it with a solid color. Acrylic paints work well. Use a good quality paint brush if you want to obtain better results. You may also create a combination of a few colors to add a fascinating touch. You can also draw various patterns and images on the wall with a pencil and then paint them accordingly. Kids are often fascinated with bright shades and interesting pictures. If its kids’ room or play place, try different innovative ideas to delight your children. If you want to give a 3D effect to the wall, draw some pictures on a separate sheet of cardboard and paint them. Use to the strong adhesive to attach them on the wall. It will create something unique which people have never seen before. The following video can help you in making a wall out of cardboard boxes:
Conclusion:
Once you have created the wall, you can place it anywhere you like. It may act as a room divider or a complete wall for any part of your house. The biggest advantage of using it is that it can be easily folded and shifted to some other place whenever you want. Moreover, if you get bored you can dispose of it and design a new one with more attractive patterns and colors to give it a fascinating look. You may be conscious of any fire hazard. Although cardboard burns more readily as compared to other construction materials like gypsum board but a little care should be taken if you place a cardboard wall in your house. The room where you have placed the cardboard wall should not contain sprinklers or fire source. Special paints are available which reduces the chance of fire hazards. You can also use them to paint the cardboard wall. If such measures are taken you can keep your wall last for long.